Wednesday, May 30, 2007

Easy image upload to your header
Makkelijk! Een afbeelding in je header

If you are using the new template with widgets, it's very easy now to upload a photo to your header. Check out the link below.

Als je een nieuw template met widgets gebruikt, is het nu heel makkelijk om een afbeelding in je header te plaatsen. Klik op de link hieronder om de video te zien.

Monday, April 23, 2007

Clickable image
Aanklikbare foto

If you click this photobucket logo in the sidebar, it brings you to the photobucket website. It's very easy to add a clickable photo to your sidebar:
Upload the photo/image/logo you want to use, because you will need a URL. I used Photobucket's logo, it's 198 pixels wide, so it will fit perfectly in my sidebar, which is 240 pixels wide, and uploaded it to photobucket's website.
Als je op het Photobucket logo in de sidebar klikt, kom je op de website van Photobucket terecht. Zo'n aanklikbaar logo is heel makkelijk te plaatsen:
Upload de foto/tekening/logo op een foto hosting website, want je hebt een URL nodig. Ik gebruikte het logo van Photobucket.com. Het is 198 pixels breed, het past dus prima in de sidebar, die hier 240 pixels breed is.

Copy the URL, if you use photobucket, you have to copy the upper line.
Kopiëer de URL, als je photobucket gebruikt, neem je de bovenste lijn.


Log in to you blog. On the dashboard click "layout"
Log in op je blog. Kies "layout" op het dashboard.


Click "Add a Page Element"
Klik "Add a Page Element"


Choose HTML/Java Script from the box that pops up.
Kies in het volgende venster HTML/Java Script.


In the next box that pops up, you can add a title.
I wanted to link to photobucket's website, so that's the URL you see in the first part between the quotation marks, replace it by the URL of the website you want to link to. The second part is the code that makes the image show up on your blog, so that's where I have pasted the URL of the uploaded logo. Replace it by the URL of your uploaded image.
In het volgende venster kan je een titel invullen als je wil.
Ik wilde naar de website van Photobucket linken, dus dat is de URL die je tussen de aanhalingstekens in het eerste deel ziet. Vervang die URL door die van de website waar je naar wil linken. Het tweede gedeelte is de code die je foto op je blog zet, dus daar heb ik de URL van het logo, die ik eerder gekopiëerd heb, weer geplakt. Vervang die URL tussen de aanhalingstekens door de URL van jouw foto.


Click "preview", if it looks OK click "Save"
Klik op "Preview". Als het in orde is klik je op "Save".

Monday, April 09, 2007

Adding a header
Een header plaatsen

Earlier I explained how I put a header on this blog. You can read about it if you click HERE.
Apperently in newer blogs the template looks a little bit different. So the changes you have to do might look like this: the red parts is what you should add or change in your template.
Eerder beschreef ik al hoe ik een header op deze blog plaatste. Je kan het lezen als je HIER klikt. Blijkbaar is het template in nieuwere blogs lichtjes veranderd, en waarschijnlijk moet je nu dit toevoegen of veranderen aan je template: ik heb de wijzigingen in rood getypt.


Click on the pictures above to enlarge them.
Klik op de foto's hierboven om ze te vergroten.

Wednesday, January 17, 2007

How do I add a background image?
Hoe plaats ik een foto/tekening op de achtergrond?

A simple way to customize your blog is adding a background image. This is how I did it, but safe a copy of your template before you do any changes:
Een eenvoudige manier om je blog te personalizeren is een foto op de achtergrond plaatsen. Ik deed het zo, maar maak een kopie van je template vooraleer je begint:
This is the picture I used. Size is 200 x 200 pixels. If the picture is on your harddisk, you can see the size when you hover over the picture.
Ik gebruikte deze foto. Afmetingen zijn 200 x 200 pixels. Als de foto op je harde schijf opgeslagen is, kan je de afmetingen zien wanneer je met de cursor over de foto gaat.
I used photo editing software to give the picture a watermark look, because I prefer it that way. Now the picture has to be online somewhere, because you need a URL. I uploaded it to Photobucket.com, as you can see below. It's free.
Ik bewerkte de foto om ze het uitzicht van een watermerk te geven, gewoon omdat ik dat mooier vind. Omdat je een URL nodig hebt, moet de foto ergens online geplaatst worden. Ik gebruikte Photobucket.com, zoals je hieronder kan zien. Het is gratis.
Copy the URL of your photo, you need the upper line in Photobucket.
Kopiëer de URL van je foto, bij Photobucket gebruik je de bovenste lijn.

Sign in to Blogger. Click TEMPLATE, and then click EDIT HTML.
Log in op je blog. Klik op TEMPLATE, en vervolgens op EDIT HTML.

Click on the photo to enlarge for better view.
Klik op de foto om ze te vergroten.
Look for the part you see on the picture above. The red text is the part I have added : it's the URL of my image. REPEAT-Y and TOP LEFT makes my image appear from top to bottom at the left side of my screen. Be sure to have all the punctuation marks right!
Zoek naar het gedeelte dat je ziet op de foto hierboven. De rode tekst heb ik toegevoegd: het is de URL van mijn foto. REPEAT-Y en TOP LEFT zorgen ervoor dat de foto van boven naar beneden herhaald wordt aan de linkerzijde van het scherm. Zorg dat alle leestekens juist zijn!

You should see your image now if you click PREVIEW. Click SAVE TEMPLATE if you are satisfied.
Je moet nu de foto kunnen zien als je op PREVIEW klikt. Klik op SAVE TEMPLATE als je tevreden bent.

Here I replaced LEFT by RIGHT: this makes the picture appear at the right side of the screen as you can see on the picture below.
Hier verving ik LEFT door RIGHT. Daardoor verschijnen de foto's aan de rechterkant van het scherm, zoals je op de foto hieronder kan zien.
Have fun!
Veel plezier!

Friday, November 17, 2006

How do I change the width of my blog
Hoe verander ik de breedte van mijn blog

When you are logged in, you can click CUSTOMIZE in the top bar. On the next screen click EDIT HTML. You see your template now. You can make a safety copy first, just in case. Look for the part you see on the picture below. The parts in red, are the things I changed to make my blog wider. 800 was 660, 520 was 410, 240 was 220. You'll notice if you add 520 to 240 it is less than 800. That's the way it should be. Click PREVIEW, if you're satisfied click SAVE TEMPLATE.

Als je ingelogd bent, kan je klikken op CUSTOMIZE. Op het volgende scherm klik je op de EDIT HTML knop. Je ziet nu je template, en je kan voor alle zekerheid eerst een kopie maken. Zoek in je template naar het gedeelte dat je op onderstaande foto ziet. De gedeeltes in't rood heb ik gewijzigd: 800 was 660, 520 was 410, 240 was 220. Je zal merken dat de som van 520 en 240 minder is dan 800, en zo hoort het ook. Klik op PREVIEW en als je tevreden bent op SAVE TEMPLATE.

Click on the photo to enlarge.

Klik op de foto om ze te vergroten.

How do I put a header on my blog
Hoe plaats ik een header op mijn blog

ETA : New easy way to add a header: Header Video : click here
Nieuwe makkelijke manier om een header te plaatsen: Header video: klik HIER

Before you do changes make a copy of your template, so you can restore it in case you messed things up.
There are probably different ways to put a header on your blog. This is how I did it:

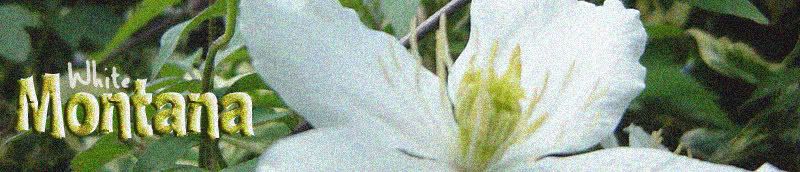
Be sure you know the dimensions of your image. Mine is 800 pixels wide and 172 pixels high. You can see the size of your image on your harddisk when you hover with the mouse over it. The last picture in this post shows what happens if the dimensions are wrong. Don't use a picture wider than 800 pixels, because people who use a low resultion would have to scroll all the time. Upload the image to a photo hosting website (I use photobucket.com, it's free) .

Vooraleer je dingen verandert aan je blog, neem je best een kopie van je template. Zo kan je alles terug herstellen als je iets verknoeid hebt.
Er zijn waarschijnlijk verschillende manieren om een header op je blog te plaatsen. Dit is hoe ik het gedaan heb:

Zorg dat je de juiste afmetingen kent van de afbeelding die je wil gebruiken. Die kan je zien als de afbeelding op je harde schijf staat, en je met de muis over de afbeelding beweegt. Mijn afbeelding is 800 pixels breed en 172 pixels hoog. Op de laatste foto van deze post kan je zien wat er gebeurt als de afmetingen niet kloppen. Gebruik geen afbeelding breder dan 800 pixels. Voor mensen die een lage resolutie gebruiken betekent het dat ze steeds de schuifbalk moeten gebruiken. Upload de afbeelding naar een photo hosting website (ik gebruik photobucket.com, het is gratis)

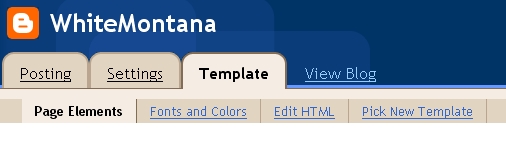
When you are logged in, you can click CUSTOMIZE in the top bar. On the next screen click on the EDIT HTML button.

Als je ingelogd bent kan je klikken op de CUSTOMIZE knop in de balk bovenaan. Op het volgende scherm klik je op de EDIT HTML knop.

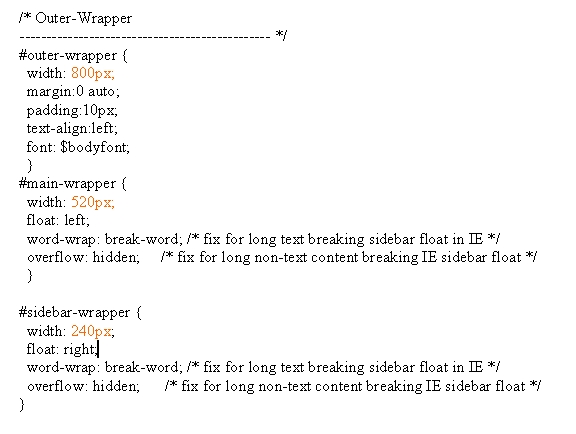
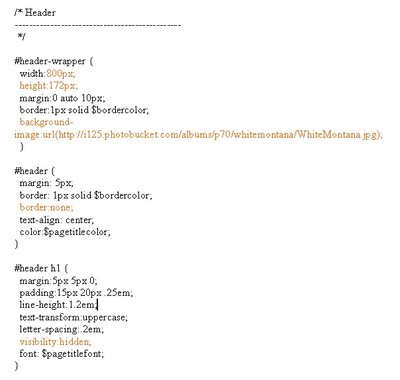
You see your template now. You can copy your template first. In the screenshot of my template you can see the lines I've changed or added, they are in red. (click on the image to enlarge it, so you can take a closer look) You can see I have put the dimensions of my image here (800 x 172). You have to add: background-image:(...) and fill in the URL of your uploaded image. Don't forget the semi-colon at the end.

Maybe your template looks different if you have a newer blog. It can look like this: Click here.


Nu zie je je template. Je kan eerst een kopie nemen. Op de foto zie je welke regels ik toegevoegd of veranderd heb. Ze staan in't rood. (Klik op de foto om ze te vergroten. Zo kan je het beter zien) Je ziet hier de juiste afmetingen van mijn afbeelding (800 x 172) . Ook heb ik background-image:(...) toegevoegd en de URL van de foto ingevuld. Vergeet de puntkomma op het einde niet.

Als je een nieuwere blog hebt, kan het template er anders uitzien, zoals hier: Klik

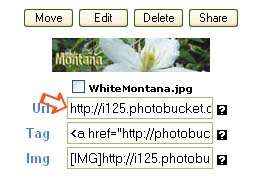
Here you can see which line you should use, the first one. Copy and paste this line to your template.

Hier kan je zien welke lijn je moet gebruiken, de bovenste. Kopiëer deze lijn en plak ze in je template.


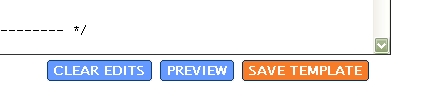
Click PREVIEW. If you're satisfied click SAVE TEMPLATE.

Klik op PREVIEW. Als je tevreden bent klik je SAVE TEMPLATE.


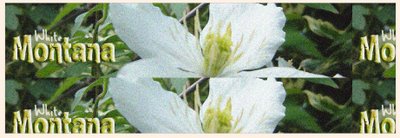
This is how it can look if the dimensions you used are wrong.


Zo kan het er uitzien als je de verkeerde afmetingen ingegeven hebt.

Sunday, June 04, 2006

My first post

This picture is a Clematis in our garden, variety is Montana, and it's white. That's how I came up with my blog name.
On this blog I'm going to try to explain things you can do to customize your blog. Not that I know much about it, just simple things you can do. I'll add screenshots wherever I can to make it easier. My English is not so good, especially if I have to explain this kind of things. So, I hope everything will be as clear as mud... :)

Op deze foto staat een clematis uit onze tuin, varieteit is montana, en de kleur is wit. Zo kwam ik aan een naam voor deze blog.
Ik ga hier proberen wat eenvoudige dingen uit te leggen die je kan doen om je blog wat aan te passen, zodat ie echt naar je zin is. Niet dat ik er veel van ken, gewoon wat simpele dingen die ik zelf geprobeerd heb. Ik zal waar het kan foto's toevoegen die ik neem van het scherm, zodat alle stappen duidelijk zijn, ... hoop ik :)